How cool would it be to show the video of your awesome vacation to all your friends at a party? How about watching the big screen movie while outside? Hm… If only you could make your smartphone into a portable projector, but that’s only a fantasy… Or is it?! Today we will show you how to make a projector using the smartphone, magnifying glass, and an ordinary shoebox.
Article Contents
1. Types of Projectors commonly used1.1. CRT (Cathode Ray Tube) Projectors
1.2. LCD (Liquid Crystal Display) Projectors
1.3. DLP (Digital Light Processing) Projectors
2. Factors influencing image quality
2.1. Brightness
2.2. Lens
3. Science Behind Homemade Projector
4. Materials needed for homemade projector
5. Instructions for making a Homemade Projector
6. What will you Develop and Learn by making Cardboard Projector
Types of Projectors commonly used
There are three types of projectors we can commonly find around. Two since one is slowly going to history. Those types are DLP (Digital Light Processing), LCD (Liquid Crystal Display) and CRT (Cathode Ray Tube). They are different based on the technology they use to project images.
CRT (Cathode Ray Tube) Projectors
CRT projectors were one of the first projectors commonly used. With today’s technology, they are getting obsolete and are less in use than their more advanced counterparts. They use 3 tubes, one for each of three additive primary colors: Red, Green, and Blue. If you want to know more about colors, check the article about mixing colors and learn all about it.
The biggest downside of CRT projectors is their large size, low light output and frequent need of aligning the three tubes so the image is correct. Because of this reason, they are mostly replaced with more friendly LCD and DLP projectors.
LCD (Liquid Crystal Display) Projectors
LCD projectors use polarized mirrors that reflect and pass trough only certain colors of light. First, the red, green and blue colors are separated and go trough the LCD panel that controls the intensity and saturation of each color. After passing through the LCD panel, the colors re-converge with the help of prism and we get the picture we want.
DLP (Digital Light Processing) Projectors
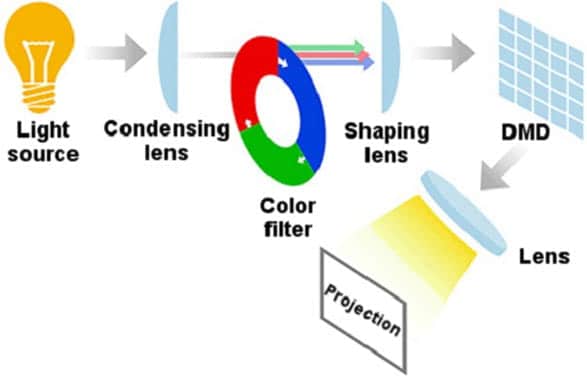
There are two types of DLP projectors based on the number of chips they contain. There are one-chip and three-chip models. Each chip contains millions of mirrors that reflect light thousands of times per second. One-chip projectors can produce more than 16 million colors while the three-chip projectors can produce more than 35 trillion colors. Impressive indeed! That makes them suitable for the production of more lifelike and natural images.
They are capable of creating a more crisp and fluid image than LCD projectors due to the more dense closeness of each mirror. That also makes pixels closer together and it is almost impossible to see any space between them.
Factors influencing image quality
Brightness
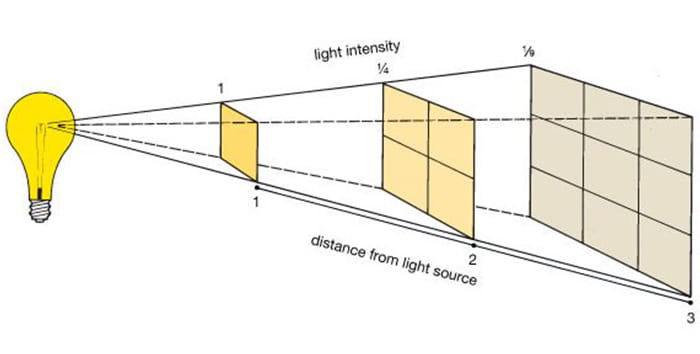
Projector brightness is measured in lumens. The size of the room and the size of the picture we want to project are the biggest factors that determine the lumen rating we need for a clear picture. In small rooms and when we are projecting on a small screen, the lumen rating between 1500 and 3000 will suffice. But in large rooms and on large screens (think of cinema) we need a lumen rating of 10000 to 28000 for a clear picture. Also, the ambient light influences the lumens we need. The higher the ambient light, the more lumens we need to see the clear image.
Lens
As with brightness, distance and screen size also play a major role in the lens we need. If the projector is close to the screen, we will need a short-throw lens. If the projector is casting on a large screen and is placed in the back of the room, we will need a long-throw lens. All projectors have a lense that specializes in one of those functions. They all can be adjusted and focused to some extent but can never play a good role in both long and short throwing of an image.
Science Behind Homemade Projector
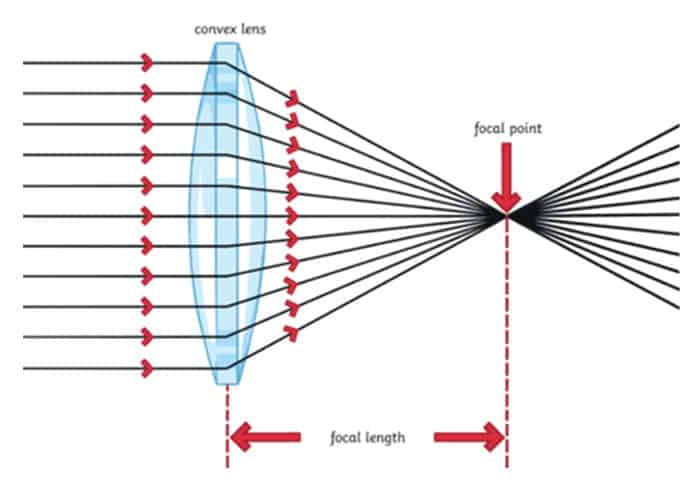
How come the video on the wall is much bigger than on the smartphone? That’s the whole point of the projector, right? Well, the explanation lies in the lens of the magnifying glass – convex lens.
The convex lens is thicker in the middle than on the edges. The light, coming from your smartphone is going in the straight line. Then, when the light reaches the focal point, it bends and converges.
From the focal point, light disperses in the opposite direction, stopping at the surface where our video is projected. That’s why the video gets bigger the further the projector is from the wall. However, that also makes the video less sharp.
That is also the reason we see our video upside down! The light coming from a focal point is projected in the opposite direction. So that is the reason why we need to turn our smartphone upside down to get a correct image.
Did you know that the human eye works similarly? Images we receive by our eyes are upside down! The lens in our eye is focusing light from the environment on the retina, where a similar process occurs. Our brain then makes the necessary correction so that we perceive the world around us in its regular shape and direction.
Materials needed for homemade projector
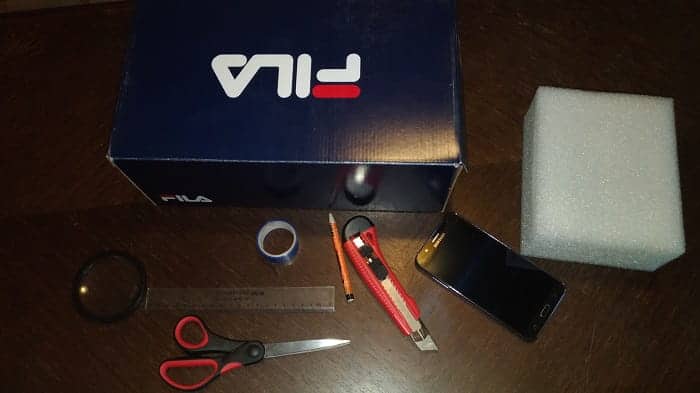
- Magnifying glass
- Shoebox
- Scissors
- Scalpel
- Cardboard or Styrofoam
- Pencil
- Smartphone
- Duct tape
- Optional: Hot glue
Instructions for making a Homemade Projector
Be sure to check out the video on how to make a homemade projector, or if you prefer to read, continue with a step by step instructions below.
1. Put the magnifying glass on a shoebox and trace the shape with your pencil. Cut it out with a scalpel or scissors.
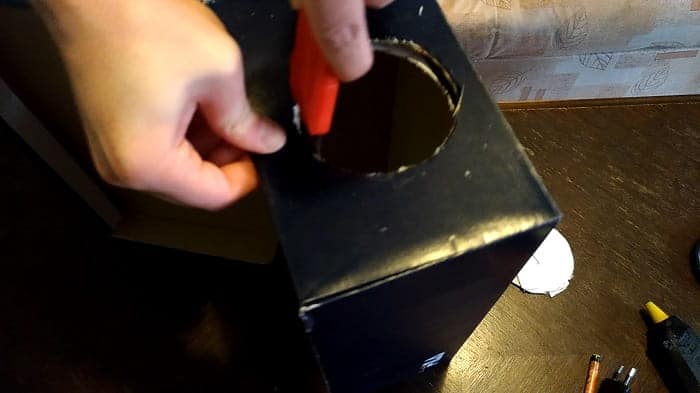
1.1. Now you can attach your magnifying glass to the hole. If it’s too loose, you can use duct tape or hot glue to secure it
2. Time to make a stand for our mobile phone. Use cardboard or styrofoam to make a smartphone stand. It would be ideal if it perfectly fits the box (from edge to edge). Also, the stand must be mobile so we can focus and sharpen the picture.
3. Put your smartphone on the stand (attach it with the duct tape), make sure it’s turned upside down. Set the brightness to maximum and turn auto-rotate to off.
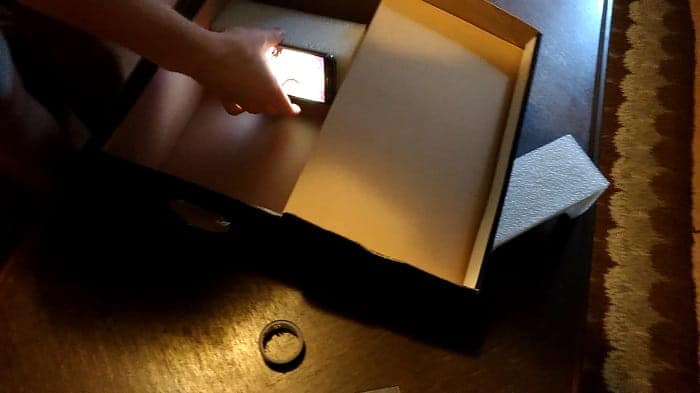
4. Put your stand inside the box.
5. Play the video, turn off the lights and enjoy the show! You can make the video sharper by moving your stand until you find the proper distance.
What will you Develop and Learn by making Cardboard Projector
- Engineering skills
- Designing skills
- Motor skills
- Oculomotor coordination
- Physics (Optics)
We hope you enjoyed making your projector and that you will enjoy even more watching videos with your friends.
If you search for even more engineering ideas, you will probably be interested in making your Potato Battery. Also, check out how to make a Cardboard Clock and how to make Cardboard Castle from toilet paper rolls.
If you’re searching for some great STEM Activities for Kids and Child development tips, you’re in the right place! Check the Categories below to find the right activity for you.

STEM Science
Videos, guides and explanations about STEM Science in a step-by-step way with materials you probably already have at your home. Find new Science ideas.
Read more
STEM Technology
Videos, guides and explanations about STEM Technology in a step-by-step way with materials you probably already have at your home. Find new Technology ideas.
Read more
STEM Engineering
Videos, guides and explanations about STEM Engineering in a step-by-step way with materials you probably already have at your home. New Engineering ideas!
Read more
STEM Math
Videos, guides and explanations about STEM Math in a step-by-step way with materials you probably already have at your home. Find new Mathematics ideas.
Read more
Psychology
Find out all about development psychology topics that you always wanted to know. Here are articles from child psychology and development psychology overall.
Read more
First year of Child’s Life
Following a Child’s development every month from its birth. Personal experiences and tips on how to cope with challenges that you will face in parenting.
Read more
5 thoughts on “How to Make a Cardboard Projector using Smartphone and Magnifying Glass”