How do we produce electricity? What is the battery? Let’s try to answer these questions by making our own Potato Battery which we can use to power up a lamp or a clock.
Article Contents
1. What is the Battery and how does it work?2. How does Potato Battery work?
3. Materials needed to make a Potato Battery
4. How to make a Potato Battery?
5. What will you develop and learn by making the Potato Battery?
What is the Battery and how does it work?
The simple answer is that the battery is the storage for energy which is then used to produce electricity. The more complex answer is that the electrical energy can’t actually be stored. The battery, when connected to the electrical current, starts to produce electrical energy. There are different types of batteries, but they all function on similar chemical principles.
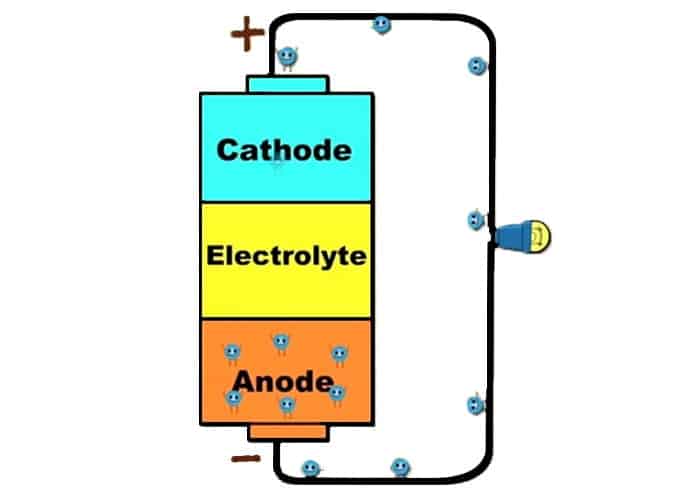
Batteries have three parts:
- Anode (negatively charged, usually marked with -). The most commonly used anode is Zinc. Zinc is a metal that has a lot of electrons and likes to give its electrons.
- The cathode (positively charged, usually marked with +). The most commonly used cathode is copper since it lacks electrons and likes to receive them.
- Electrolyte (liquid or a paste between them). Without the electrolyte, the electrons would just simply pass from the anode to cathode and that would be it. But electrolyte helps the electrons to flow back to the anode and to create an electrical circuit.

There is surplus of electrons in the anode and a shortage of electrons in the cathode. Since electrons want to be in balance, they want to go from the anode to the cathode. However, they can’t pass because electrolyte prevents them. When anode and cathode are connected in an electrical circuit with the wire, an electrical current is produced. Now electrons can flow from anode to cathode with the help of the wire. The chemical processes in electrolyte take extra electrons from cathode so it constantly stays with the shortage of electrons and the circuit can continue.
The electrical circuit means that the electrical energy or charge (we call that voltage) is produced somewhere and that it has a path to flow (we call that electrical current). Another part of the electrical circuit that we must not forget is resistance. Resistance slows down or stops the electrical current and can be changed into heat, light, sound, or some other type of energy. The light bulb is a good example of resistance where it creates light when added to the electrical circuit.
One interesting thing worth noting is that conventional current flows from positive to negative, opposite of an actual electron flow. The reason for this is historical – in time when this was decided, we didn’t know much about electrons and it stayed because of all the formulas that rely on it.
How does Potato Battery work?
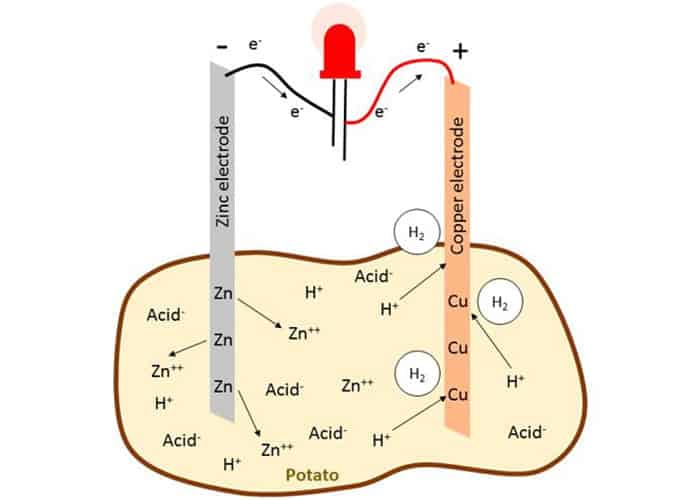
Potato batteries work in a similar way. It consists of all 3 parts:
- Zinc nail is an anode (has a surplus of electrons),
- Copper nail is a cathode (wants some electrons) and
- Potato or other fruit is an electrolyte.
When we put a zinc nail in the potato, a chemical reaction occurs and it produces a surplus of electrons. Copper, which now has fewer electrons, attracts them. When we connect those nails with the wire, we create an electrical circuit in which electrons are flowing and producing enough electricity to light up a lamp or a clock. Potato energy!
We already mentioned that all batteries have a positive and negative electrode or terminal. And to create an electrical circuit, we need a conductor that will allow electrons to flow through them. Materials, like copper and iron, are good conductors of electricity. Through the conductor, the electricity will go from the negative electrode of the battery to the positive electrode. The force at which electrons are moving is measured in volts or voltage.
So how can potatoes serve as an electrolyte? Potatoes are rich in phosphoric acid, sodium ions, potassium ions, chloride ions, and all kinds of dissolved salts. That makes it a perfect electrolyte.

If we stick Zinc and Copper nails into the potato, it will act as a buffer between those two metals, preventing the flow of electrons. If we connect two nails with the wire (conductor), the electrons will begin to move. When electrons pass from Zinc to Copper, the potato starts to react and releases electrons from copper ensuring the equilibrium is not reached. That creates a constant flow of electrons from zinc to copper. As long there are enough chemicals inside of the potato to serve as an electrolyte.
One potato can produce around 0.5 Volt of electrical energy. That means we need around 3 potatoes to power up a LED lamp of 1.5 Volts. But if we cut the potato in half, each half will generate the 0.5 Volts so we can use only one and a half of the potato to create the potato battery.
Potato is not the best electrolyte among fruits and vegetables. For example, lemons work even better than potatoes! But since potatoes are more common, cheap, and resistant, they are the best choice for organic production of electricity.
Materials needed to make a Potato Battery

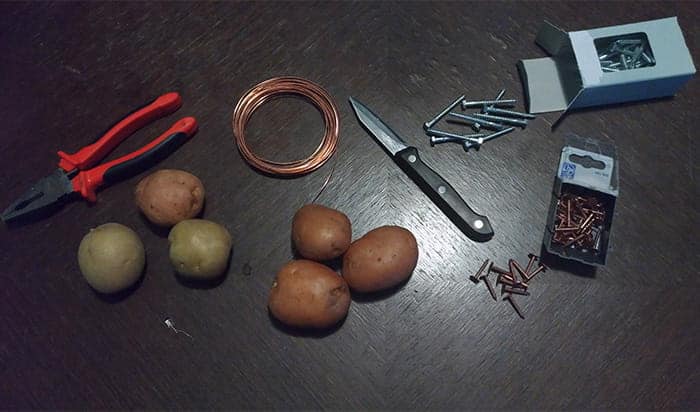
- LED Lamp. If you can get your hands on the 1.5V LED lamp, that would be best. But they are rarer. The easiest one to get is from the lighter that you can buy in any convenience store or from Christmas tree decorative lamps. That one requires 3.5V but that is still good enough to create our potato battery.
- 3 to 5 Potatoes. This can vary and mostly depends on the Voltage of the lamp you will be using. We used a 3.5V lamp since it is easiest to get. Also, it can depend on the potato freshness where more fresh potatoes can produce more Voltage. But the general rule of thumb is that we need one potato per 0.5V. But don’t forget we can slice potatoes in halves and each half can produce 0.5V, so we can say that each potato (sliced in half) can produce 1V. If you plan to use slices, we can plan: 1 potato needed per 1 Volt required for our lamp.
- Copper Nails. Copper coins can work well here too, but copper nails are more convenient to work with. We can get them from any hardware store. We will need 6-12 copper nails for our battery. We need the same amount of nails as potatoes (slices).
- Zinc Nails (galvanized nails). Same as copper nails. We will need 6-12 of them and we can buy them in any hardware store.
- Copper Wire. We can also get a copper wire in the hardware store and one meter of it will be more than enough. The thinner wire you can get the better since it will be easier to wrap it around our electrodes (copper and zinc nails).
- Knife. Regular kitchen knife, used to cut our potatoes on halves.
- Pliers. Used to cut and wrap our wire around nails.
How to make a Potato Battery?
There is a video of step by step guide on how to connect potatoes and power the lamp. So we suggest you watch the video, or if you prefer reading, continue with the instructions below.
- Cut the potatoes in halves. If you decide to work with halves, use the kitchen knife to cut each potato into halves. Wash the potato first so the dirt doesn’t interfere with our electrolyte reaction. Remember, each half produces around 0.5V so you can plan how much halves you need to power the lamp. For a 3.5V lamp, we will need 7 halves of potato. You can connect 4 slices and then gradually add more until the lamp lightens up.
- Cut the copper wire using the pliers. To start, cut 8 pieces of copper wire with a length of around 20 cm. If the wire is thicker and harder to fold, use pliers to wrap it around nails. Fold one end of the wire around the copper nail and the other end around the zinc nail.
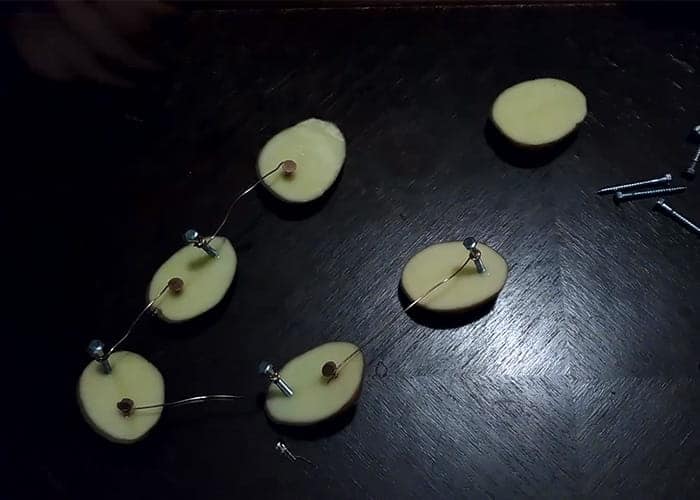
- Stick your first copper nail into the first slice of the potato. Stick the zinc nail, that is connected with the wire to the first copper nail, into the second slice of the potato.
- Now stick the second copper nail into the second slice of potato (same slice where we already have the first zinc nail). Stick the second zinc nail (that is connected with the wire to the second copper nail) into the third potato slice.

- Repeat the process until all potato slices are connected. Since we have Zinc and Copper nail in each potato slice, it is important that they don’t touch each other. Best to stick them each on different edges of the potato so there is space between them.
- When we connect all potato slices this way, you will notice we have only copper nail in our first slice and zinc nail in the last slice of the potato. Now wrap copper wire around one zinc nail and stick the nail into the first potato slice. Leave the other end of the wire loose. Wrap the wire around one copper nail and stick it into the last potato slice. Leave the other end of the wire loose.
- Connect the loose wire ends on the lamp. We must connect it in the proper way, + to + and – to – for the lamp to light up. If you can’t tell which lamp wire is positive and which is negative, just swamp connected wires. And if it still doesn’t light up, add more slices of potato until the lamp lights up.
- And there you have it. Your homemade, natural, and renewable source of electric energy!
What will you develop and learn by making the Potato Battery?
- Knowledge about electricity and electrical circuits
- The functioning of a battery
- How to make our own battery
- Engineering skills
- Chemistry and chemical reactions
We hope you enjoyed this activity. If you are interested in more fun Engineering activities, check out How to make a homemade projector. And for more great kitchen experiments, check out how to crush a can using water and how to shrink a bag using microwaves.
If you’re searching for some great STEM Activities for Kids and Child development tips, you’re in the right place! Check the Categories below to find the right activity for you.

STEM Science
Videos, guides and explanations about STEM Science in a step-by-step way with materials you probably already have at your home. Find new Science ideas.
Read more
STEM Technology
Videos, guides and explanations about STEM Technology in a step-by-step way with materials you probably already have at your home. Find new Technology ideas.
Read more
STEM Engineering
Videos, guides and explanations about STEM Engineering in a step-by-step way with materials you probably already have at your home. New Engineering ideas!
Read more
STEM Math
Videos, guides and explanations about STEM Math in a step-by-step way with materials you probably already have at your home. Find new Mathematics ideas.
Read more
Psychology
Find out all about development psychology topics that you always wanted to know. Here are articles from child psychology and development psychology overall.
Read more
First year of Child’s Life
Following a Child’s development every month from its birth. Personal experiences and tips on how to cope with challenges that you will face in parenting.
Read more
3 thoughts on “How to Make a Potato Battery”