Mommy, when will the cartoon start? When do we go to the granny? Mommy, when will lunch be ready?
I bet you hear these and similar questions many times a day. It can be hard to answer them without using time. Your answer: “Honey, the cartoon will be on in half an hour” and you can see a blank expression in your child’s eyes. Sadly, half an hour is meaningless to someone who doesn’t understand the concept of time. And sure enough, after five minutes, question repeats and you decide it’s finally time to teach your child how to tell time!
A brief history of telling time
We don’t know exactly when, but some time ago, our ancestors faced similar problems. They needed to organize their daily lives and for that they needed a concept of telling time. As with many other discoveries, we can trace the origin of the first time-telling devices to Egypt, 3500 years b.c. They invented the system of dividing the day into some number of equal parts - they decided on 12.
But beside the system, there is one more ingredient needed to tell time - way to measure the passage of the time. And even back then, there was a simple and effective (although not very precise) way to do that - position of the Sun on the sky. Those first “clocks” were sundials. They had two parts; metal plate with inscribed marks that represent hours and the attached rod which is responsible for casting a shadow on the plate. There were also obelisks - huge stones which worked in a similar way. Those were the first “public” clocks.
Sundials were one of the first Clocks ever used
But other ancient civilizations also developed their solutions - water clock, candle clock and hourglass to name the few. The first mechanical clocks were invented in Europe in the early 14. century. The big improvement in precision came with the pendulum clock in 17. century.
All modern clocks use the similar mechanics - there is a harmonic oscillator which is a physical object (pendulum, quartz crystal or even electrons in the atom). It vibrates at a particular frequency and that’s how the time is measured.
Making your own clock
Knowing to tell time is an important skill for making your child more self-sufficient. The average age at which children develop it is 6 years or when they start school. But many children learn to tell time even before that, around the age of 4. If your child knows how to count to 20 (or 12) there are no obstacles in learning.
Try making the learning to tell the time as fun as possible
As you are well aware, there are two types of clocks: analog and digital. Digital is much simpler to learn, especially as the child gets better with numbers. Analog is a bit more abstract and 2 hands can be troublesome to understand, but it’s also very visual. That gives us an opportunity to approach learning in a more creative way.
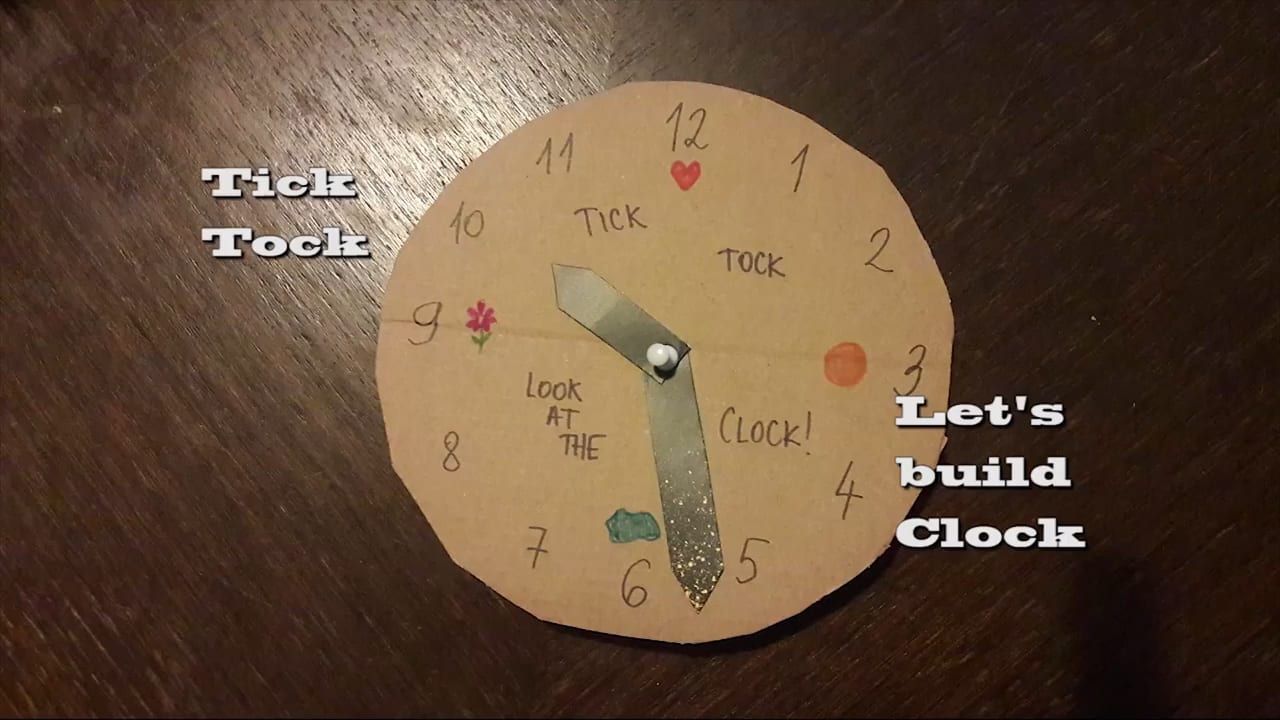
So why then not make your own cardboard clock and help your child with learning?
Materials needed to make a Cardboard Clock:
- Cardboard (any old box or some other thick paper)
- Compass (drawing tool, but you can use any round bowl or lid)
- Scissors
- Pencil, colored pencils or markers
- Pin
- Bonus
- Polystyrene
- Glue
Compass is your best friend in drawing circles
Instructions to make a Cardboard Clock:
- On the bigger piece of cardboard, draw a circle using the compass or any round object. 2) Cut that circle with scissors. 3) Make clock hands (big and small) from the cardboard, ideally using 2 different colored pieces of cardboard for easier recognition. 4) Write numbers from 1 and 12 in their positions. 5) As a bonus, you can draw certain symbols (heart, flower, star…) next to the numbers (at least main ones: 3, 6, 9 and 12) so it will be easier to visually connect numbers and symbols. 6) Connect hands and pin them to the clock’s surface. 6.1. You can glue a piece of polystyrene on the back of the clock so that pin is secured. 7) Decorate it as you wish and you are ready for playing...I mean, learning.
What will you develop and learn?
- Tell the time, duh!
- Learning numbers and develop math reasoning
- Fine motor skills
- Engineering skills, planning and building a project
- Creativity
- Patience
- Self-sufficiency and confidence
If you're interested in more cardboard crafts and activities, be sure to check Let's make Toilet Roll craft project: Cardboard Castle and How to make projector using a smartphone and magnifying glass.