Rockets are fun in every shape and size, wouldn’t you agree? Today we will show you how to make one with some very simple ingredients. Join us in the thrill of the launch!
Article Contents
1. The science behind Matches2. The Science behind Match Head Rocket
3. Materials needed for Match Head Rocket
4. Instructions for making Match Head Rocket
5. What Skills will you Develop and Learn
The science behind Matches
The first matches were invented by John Walker in 1827. At that time, they were revolutionary! Before matches, people used to rub sticks to create enough heat to create fire on dry leaves or grass. It wasn’t very efficient. Then, people discovered that striking flint with a rock creates a spark and they used it to create fire. It was better than rubbing sticks but still tedious and inefficient. So no wonder that matches were such a big deal in the early 19th century.

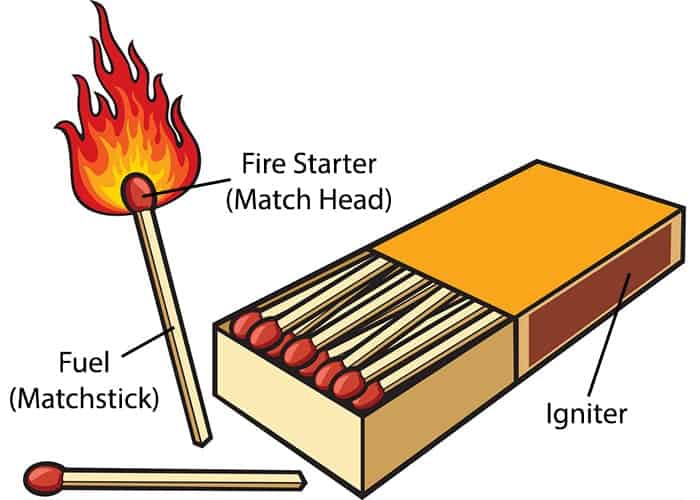
Today’s matches most of the time use two flammable compounds: Sulfur and Red Phosphorus. The fire is created by a simple chemical reaction. Striking a match, we create friction. Friction creates heat and the flammable compounds ignite thanks to oxygen in the air. Some matches also contain an oxidizing agent, for example, potassium chlorate. The oxidizing agent provides extra oxygen that helps with the ignition of the match.
The striker on the box of the matches contains glass powder and sand. Glass powder and sand provide extra friction and help with the release of an oxidizing agent. They also help in turning the red phosphorus into white phosphorus which is more volatile and ignites easily.
The Science behind Match Head Rocket
The Match Head Rocket is a great demonstration of Third Newton’s Law of Motion that states that for every action there is an equal but opposite reaction. We won’t go into details here since we have already covered Newton’s Laws and how the rockets fly in How to make Homemade Rocket with Vinegar and Baking Soda article so be sure to check that.
In our case with Match Rocket, when the match lights up on fire (combusts), there are tiny particles of gas produced (which we see as smoke). The aluminum foil prevents them from going out so as they are trying to escape, the pressure builds up. We call that movement of mass in one direction thrust and that is our “action”.

As per Newton’s law, that means there will be an equal force, but in the opposite direction. That reaction is the launching of our rocket which will continue to move in the opposite direction.
How far will it move? Newton’s second law states that the acceleration of an object depends on the net force acting upon the object and the mass of the object. So in our rocket’s case, it depends on the size of an exhaust port (force – how fast will pressure build) and the mass of energy produced by combustion (gas and smoke).
The more match heads you use, the bigger the energy, so the rocket will have stronger thrust and therefore fly further.
This is the same principle on which “real” rockets operate, although of course, they don’t use match heads as a fuel, they use specialized rocket fuel.
Materials needed for Match Head Rocket

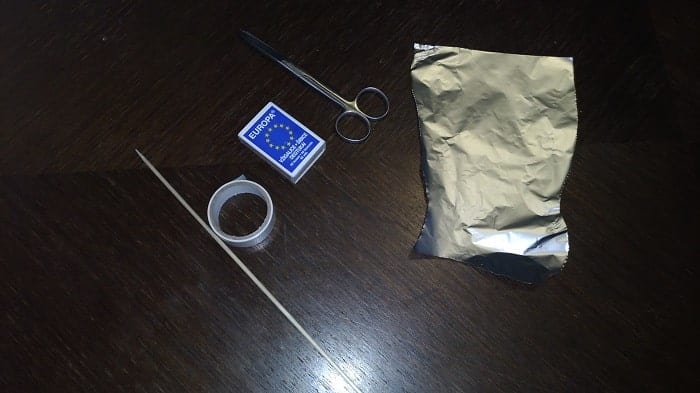
- 4-6 matches. Regular matches are good and we can buy them in any grocery shop. We will need only 4 to 6 matches, depending on how strong the thrust we want to create. Also, we need one match to “ignite our engines”.
- Piece of aluminum foil (10×10 cm). The aluminum foil is the base of our rocket. We need aluminum foil so the match head doesn’t spread in all directions. We want it to go through the exhaust port to create enough force to propel the rocket forward.
- Wooden skewer. Or some other thin stick. The wooden skewer is perfect because it will leave small enough room for a great exhaust port but big enough that we can fill our rocket with “fuel”.
- Paperclip. This will be our launch station. We will create a launchpad from a paperclip to aim our rocket so it flies in the desired direction.
- Duct tape. We will use duct tape to decorate our rocket with wings and to attach the launchpad for the surface so it can hold our rocket.
- A piece of Cardboard. This is optional but we can use a piece of cardboard to attach our paperclip to it. That way, we are creating a mobile launch pad.
Instructions for making Match Head Rocket
For visual instructions of making the match head rocket, we recommend you check the video at the beginning of an article. And for step by step instructions, continue reading below.
- Cut match heads in tiny pieces. Scissors are great for that and we can use them to scratch the match head from the match stick. We can also use our nails. We will use the match head as the main fuel for our rocket. Remove the match head from 4 to 6 matches, depending on how strong thrust you want to create.
- Wrap aluminum foil tightly around the wooden skewer or a thin stick. Let aluminum foil go over the tip of the skewer for around 4 centimeters. Wrap that excess of aluminum foil around the tip of a wooden skewer.
- Gently take out the wooden skewer from the aluminum foil. Now we have our aluminum rocket body with a whole of a wooden skewer. That will be our exhaust port.
- Put all the match heads into the aluminum foil. Use the wooden skewer to push all the match heads to the tip of the foil.
- Decorate your rocket. While the wooden skewer is still inside the aluminum foil from pushing the match heads, you can decorate your rocket. You can use duct tape to make wings. Fold the piece of duct tape and attach it to a rocket.
- Now let’s make a launchpad. We can use a paperclip and fold one end upwards. Then we can attach the paperclip to the piece of cardboard to make a mobile launchpad for easy transport.
- Slowly put your rocket on the launchpad. Light one match and hold it under the tip of your rocket. 3, 2, 1, blast off!
Caution: Plan where to launch your rocket. Do it in a safe environment because it can fly far! We advise launching the rocket under adult supervision and outside. Nobody should stand in front of the rocket when it launches. Also, after the launch, the rocket can be pretty hot so watch if trying to pick it up.
What Skills will you Develop and Learn
- Newton’s laws of motion
- Principles of Propulsion
- Combustion fundamentals
- Engineering skills
If you liked building Match Head Rocket, and you want more cool science experiments, check out:
- Can Crush Experiment and learn about air pressure.
- Shrinking Bag Experiment and learn about microwaves.
- How to make Popsicle Catapult and learn more about launching projectiles.
- Candle in the Vacuum Experiment to learn about the effects of oxygen on a flame.
- What is Inertia and how to demonstrate it and learn about Newton’s laws and inertia in details.
If you’re searching for some great STEM Activities for Kids and Child development tips, you’re in the right place! Check the Categories below to find the right activity for you.

STEM Science
Videos, guides and explanations about STEM Science in a step-by-step way with materials you probably already have at your home. Find new Science ideas.
Read more
STEM Technology
Videos, guides and explanations about STEM Technology in a step-by-step way with materials you probably already have at your home. Find new Technology ideas.
Read more
STEM Engineering
Videos, guides and explanations about STEM Engineering in a step-by-step way with materials you probably already have at your home. New Engineering ideas!
Read more
STEM Math
Videos, guides and explanations about STEM Math in a step-by-step way with materials you probably already have at your home. Find new Mathematics ideas.
Read more
Psychology
Find out all about development psychology topics that you always wanted to know. Here are articles from child psychology and development psychology overall.
Read more
First year of Child’s Life
Following a Child’s development every month from its birth. Personal experiences and tips on how to cope with challenges that you will face in parenting.
Read more
3 thoughts on “How to Make a Match Head Rocket”